Plumbing Drips & Cartridge Replacements
Fluid control under domestic pressures relies entirely on elastomeric seals and precision-ground alumina ceramics. Learn the exact mechanical protocol to diagnose and renew weeping taps and running cisterns.
The Physics of Tap Failure
A water faucet under typical residential supply experiences 2.5 to 4.5 bar (36 to 65 PSI) of hydrostatic pressure. Every time a valve is cycled, microscopic mineral particulates suspended in the municipal water supply (primarily calcium carbonate and silica flakes) are dragged across sealing boundaries.
Older traditional fixtures employ rubber compression washers compressed by a threaded brass spindle against a cast seat. Modern single-handle mixer taps substitute this with two counter-sliding ceramic disks featuring micro-lapped planar surfaces that sheer fluid channels open or shut.
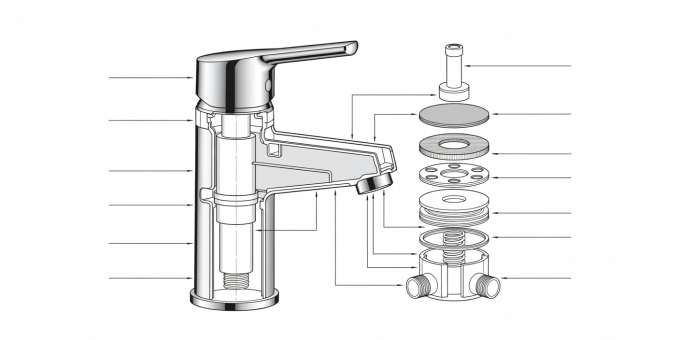
When a leak occurs, its geometric origin indicates the exact failed part:
-
Continuous Weeping from the Spout Aerator
Water bypassing the closed valve face. In quarter-turn or single-lever taps, this means the ceramic discs are pitted or calcium scale has lodged between them. Solution: Remove cartridge, soak in 10% sulfamic or acetic acid, or replace cartridge module entirely ($8–$14).
-
Water Puddling Around the Base Collar
Water leaks when the tap is turned on, pooling around the deck plate. This is caused by dried nitrile O-rings on the exterior cartridge body or swivel spout neck. The cartridge itself is sound; only the $0.50 nitrile O-rings need renewal and lubrication with food-grade silicone grease.
-
Under-Sink Flexible Hose Moisture
Stainless steel braided hoses (monobloc tails) use internal rubber tubes clamped to brass ends. Over-tightening during installation crushes the captive rubber washer inside the 1/2” female union. Back off nut, replace the flat EPDM gasket, and hand-tighten plus quarter turn.
“Never apply excessive hand torque when closing a dripping tap. Doing so only crushes the brass seating stem without arresting water flow, turning an eight-dollar gasket repair into a full fixture replacement.”
— Field Service Manual, Pickle Parade PopixFive-Step Methodical Cartridge Extraction
Follow this disciplined sequence to extract and service a mixer cartridge without marring visible chrome finishes:
- Hydrostatic Isolation: Turn the service isolation ball valves beneath the sink 90 degrees until the screwdriver slot sits perpendicular to the pipe. Open the faucet fully to drain residual pressure.
- Index Button Removal: Using a thin plastic pry tool or razor blade, pry off the tiny hot/cold red-and-blue decorative index plug situated on the handle.
- Set Screw Release: Insert a 2.5mm or 3mm hex key (Allen key) through the aperture. Loosen the grub screw 3 complete turns counter-clockwise. Lift the handle vertically off the brass lever stem.
- Decorative Dome Collar: Hand-unscrew the smooth chrome dome shroud. If stuck with limescale, wrap a thick elastic rubber band around the ring to gain friction before gripping. Avoid metal pliers.
- Brass Retaining Nut: Using an adjustable smooth-jaw pliers wrench, turn the large hexagonal brass nut counter-clockwise. Pull the plastic/ceramic cartridge cartridge vertically from the tap cavity.
Gravity Toilet Cistern Weeping
A toilet that runs intermittently every ten minutes is leaking water from the cistern reservoir down into the bowl through the flush valve seat. This phantom flushing wastes upwards of 200 liters daily.
In modern dual-flush push-button systems, this failure is virtually always caused by a thin silicone flapper diaphragm disk (such as standard Geberit, Fluidmaster, or Siamp profiles) acquiring a film of slime and mineral grit. Unclip the central flush tower with a 45-degree twist, unhook the transparent silicone washer from its retaining groove, wash thoroughly in warm soapy water, invert it, and reinstall. In 85% of cases, this restores a hermetic seal with zero replacement cost.